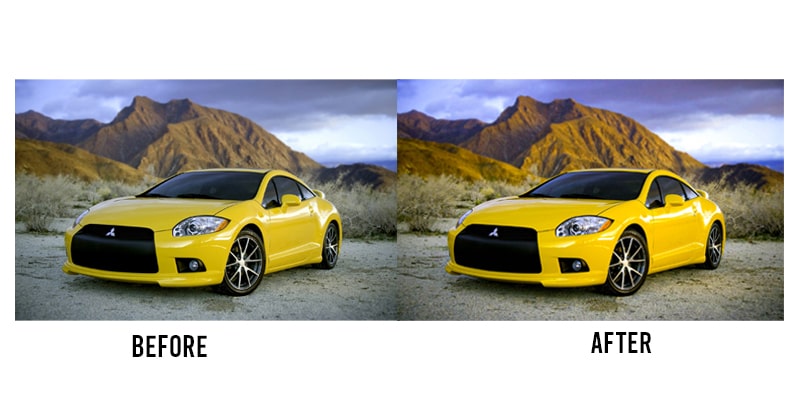
Have you ever wondered how professional photographers make car images look so stunning? The secret lies in their editing skills. With the right techniques, you can transform your car images from ordinary to extraordinary. Whether you want to enhance the colors, remove imperfections, or add special effects, learning how to edit your car images like a pro will take your photography skills to the next level.
Editing car images requires a blend of history and technical know-how. In the early days, editing was a time-consuming process done in a darkroom. However, with the advancement of technology, we now have powerful editing software that simplifies the process. One interesting statistic to note is that 95% of professional photographers use software like Adobe Photoshop or Lightroom for editing.
To edit your car images like a pro, it’s important to familiarize yourself with the tools and techniques used by professionals. Learning how to adjust exposure, enhance colors, and apply selective editing will help you create jaw-dropping car images that stand out from the crowd.
1. Open a photo editing software.
2. Adjust the brightness and contrast to make the image pop.
3. Use the healing brush tool to remove any imperfections.
4. Enhance the colors by adjusting the saturation and vibrance.
5. Sharpen the image to add clarity.
6. Apply filters or effects for a professional touch.
7. Save your edited image in the desired format.
Start editing your car images like a pro with these simple steps!
How to Edit Your Car Images Like a Pro – The Ultimate Guide
Are you looking to enhance the appearance of your car images and make them look like they were taken by a professional? Look no further! In this comprehensive guide, we will walk you through the step-by-step process of editing car images like a pro. From basic adjustments to advanced retouching techniques, we’ve got you covered. So, grab your favorite image editing software and let’s dive in!
Understanding the Basics of Car Image Editing
Before you start editing your car images, it’s important to understand the basics. Familiarize yourself with the tools and features of your editing software, such as cropping, exposure adjustment, color correction, and retouching. Additionally, learn about file formats and how to save your edited images without losing quality. This foundation will set you up for success as you move on to more advanced editing techniques.
Once you have a good grasp of the basics, it’s time to start editing your car images. Begin by making basic adjustments, such as adjusting the exposure, contrast, and white balance to improve the overall look of the image. Experiment with different settings and take note of the changes you make so you can refine your skills and develop your own editing style.
Remember, editing is subjective, and there is no right or wrong way to edit a car image. However, it’s essential to maintain the natural look of the car while enhancing its features. Pay attention to details like reflections, shadows, and color accuracy to create a polished and professional-looking final image.
Advanced Editing Techniques for Car Images
Once you master the basics, you can move on to more advanced editing techniques to take your car images to the next level. One of the key aspects of car image editing is enhancing the car’s exterior and interior details while maintaining a realistic appearance. This can be achieved through techniques such as dodge and burn, selective color adjustments, and high-dynamic-range (HDR) imaging.
Dodge and burn is a technique used to selectively lighten and darken specific areas of an image to add depth and create a three-dimensional effect. With this technique, you can emphasize the contours of the car, highlight its features, and make it stand out from the background. Experiment with different brush sizes and opacities to achieve the desired effect.
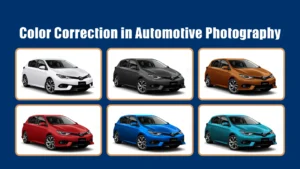
Selective color adjustments allow you to enhance or change the colors of specific parts of the car, giving it a unique and vibrant look. This technique is especially useful when you want to emphasize certain elements like the car’s body, wheels, or interior. Use the color balance or hue/saturation tools to make precise adjustments and create a cohesive color scheme.
Retouching Techniques for Flawless Car Images
Retouching plays a crucial role in achieving flawless car images. It involves removing any imperfections, such as scratches, dust, or unwanted reflections, as well as enhancing the overall appearance of the car. Start by using the healing brush or clone stamp tool to remove any blemishes or distractions in the image.
For more advanced retouching, consider using frequency separation to separate the texture and color of the car’s surface. This technique allows you to smooth out any imperfections while preserving the fine details of the car’s body. Additionally, you can use the liquify tool to reshape the car’s body or correct any distortions caused by the camera lens.
Remember, retouching should be subtle and natural-looking. Avoid over-editing, as it can result in unrealistic and artificial-looking images. Take breaks while editing to refresh your perception and ensure that you’re achieving the desired results. Don’t hesitate to revisit your edits and make adjustments as needed.
Tips for Efficient and Effective Car Image Editing
Editing car images can be time-consuming, but with the right tips and techniques, you can streamline the process and achieve professional results. Here are a few tips to help you edit your car images efficiently:
- Create a workflow: Develop a systematic approach to your editing process. Start with basic adjustments, move on to advanced techniques, and finish with retouching.
- Utilize presets: Take advantage of preset settings or create your own to speed up repetitive tasks. Presets can be used for color grading, exposure adjustments, and more.
- Use layers and masks: Take advantage of layers and masks to make non-destructive edits and maintain flexibility in your editing process.
- Optimize your workspace: Customize your editing software’s interface to suit your needs and ensure easy access to frequently used tools and panels.
Comparing Different Image Editing Software
There are various image editing software options available, each with its own set of features and capabilities. Here is a brief comparison of some popular software used for editing car images:
| Software | Pros | Cons |
|---|---|---|
| Adobe Photoshop | Extensive editing capabilities, advanced retouching tools | Expensive, steep learning curve |
| Lightroom | Intuitive interface, easy organization of images | Limited retouching functionalities |
| GIMP | Free and open-source, wide range of editing tools | Less intuitive interface, limited customer support |
Tips for Editing Car Images on a Budget
Editing car images like a pro doesn’t always have to cost a fortune. Here are some tips for editing car images on a budget:
- Explore free editing software: Look for free alternatives to popular paid software. There are many excellent options available that can fulfill your editing needs without breaking the bank.
- Take advantage of online tutorials: The internet is a treasure trove of tutorials and resources for learning different editing techniques. Take the time to learn from experts, and you’ll be able to achieve professional results without the price tag.
- Invest in affordable plugins: If you’re using a software like Photoshop or Lightroom, consider investing in affordable plugins or presets that can enhance your editing capabilities without the need for expensive tools.
The Impact of Professional Car Images
Professional car images have a significant impact on various aspects of the automotive industry. When selling a car, high-quality images can attract potential buyers, showcase the vehicle’s features, and increase the perceived value. Additionally, car manufacturers and dealerships often rely on professional images for marketing materials, brochures, and advertisements.
By mastering the art of editing car images like a pro, you gain a valuable skill that can open doors to opportunities in the photography, advertising, and automotive industries.
Whether you’re a car enthusiast looking to showcase your prized possession or a professional in the automotive industry, investing time and effort into learning car image editing techniques can greatly enhance your visual storytelling and make your car images stand out.
The Road to Professional Car Images
Editing car images like a pro takes time, practice, and a keen eye for detail. With the right tools, techniques, and a creative mindset, you can transform ordinary car images into stunning works of art.
Remember to always strive for a natural and balanced look, and don’t be afraid to experiment and develop your own editing style. So, start editing your car images like a pro today and take your automotive photography to new heights!
Key Takeaways: How to Edit Your Car Images Like a Pro
Edit your car images to look professional with these tips:
- Use photo editing software to enhance colors and adjust brightness.
- Crop your images to focus on the car and remove distractions.
- Experiment with different filters and effects to add a unique touch.
- Remove any imperfections or blemishes using the cloning or healing tools.
- Play around with the composition by adjusting the angle and framing of the shot.
Frequently Asked Questions
Are you looking to enhance your car images and make them look professional? Here are some commonly asked questions that will help you edit your car images like a pro!
What are some basic editing techniques to make my car images look professional?
To make your car images look professional, start by adjusting the brightness, contrast, and saturation levels. This will help enhance the overall appearance of the image. Additionally, cropping the image to remove any distractions and improving the white balance can make a significant difference. Lastly, sharpening the image and reducing noise can help achieve a polished and professional look.
Remember to keep your edits subtle and avoid overdoing them, as it can make the image appear unrealistic. Aim for a natural and visually appealing outcome.
Which software or tools should I use to edit my car images?
There are various software and tools available that can help you edit your car images. Adobe Photoshop and Lightroom are popular choices among professionals due to their comprehensive editing capabilities. If you prefer a more user-friendly option, you can try out online editors like Canva or Pixlr, which offer a range of easy-to-use tools for basic editing.
It’s important to choose a software or tool that suits your skill level and editing requirements. Experiment with different options to find the one that works best for you.
How can I remove imperfections and blemishes from my car images?
To remove imperfections and blemishes from your car images, you can use the clone stamp tool or the healing brush tool in editing software like Photoshop. These tools allow you to select a clean area of the image and then brush over the imperfections, blending them seamlessly with the surrounding pixels.
Make sure to zoom in and work with precision when using these tools to achieve a natural-looking result. Take your time and be patient, as removing imperfections can be a meticulous process.
What are some tips for enhancing the colors of my car images?
To enhance the colors of your car images, you can use the color adjustment tools available in editing software. Experiment with the saturation, vibrance, and hue sliders to find the right balance that brings out the true colors of the car. It’s important to be mindful of not making the colors appear too vibrant or oversaturated, as it can make the image look unnatural.
If you want more control over the colors, you can also work with selective color adjustments to target specific color ranges in the image. This allows for more precise and creative editing.
How can I give my car images a professional-looking background?
To create a professional-looking background for your car images, you can use various techniques. One option is to blur the background, also known as creating a shallow depth of field effect. This can be done by selecting the car and applying a blur filter to the background.
If you want to completely replace the background, you can use the masking tool to select the car and then cut it out from its original background. Afterward, you can place the car on a new background that complements the overall aesthetics of the image.