How to Edit Car Photos: When it comes to capturing the beauty of cars through photography, one cannot underestimate the transformative power of editing in Lightroom. This powerful software allows photographers to enhance colors, adjust lighting, and bring out the intricate details of the car, taking it from ordinary to extraordinary. But did you know that Lightroom not only enables you to edit your car photos but also provides a plethora of tools and features specifically designed for automotive photography? From adjusting the vibrance to highlighting the sleek lines, Lightroom empowers photographers to create stunning images that truly capture the essence of the vehicle.
When editing car photos in Lightroom, it is essential to understand the key aspects that can make your images stand out. One significant aspect is the history and background of automotive photography, which has a rich tradition of capturing the allure and power of automobiles. By acknowledging this history, you can pay homage to the classic techniques used by automotive photographers and infuse them with your unique creative style. Another crucial aspect is utilizing the right tools and techniques to bring out the best in your car photos. Whether it’s adjusting the exposure to emphasize the curves or using selective editing to enhance specific areas, Lightroom offers a wide range of options that allow you to showcase the true beauty and personality of the vehicle. With 10,000 car photos uploaded to Instagram every month, mastering the art of car photo editing in Lightroom is not just about creating visually appealing images, but also about making your work stand out in a sea of automotive photography.
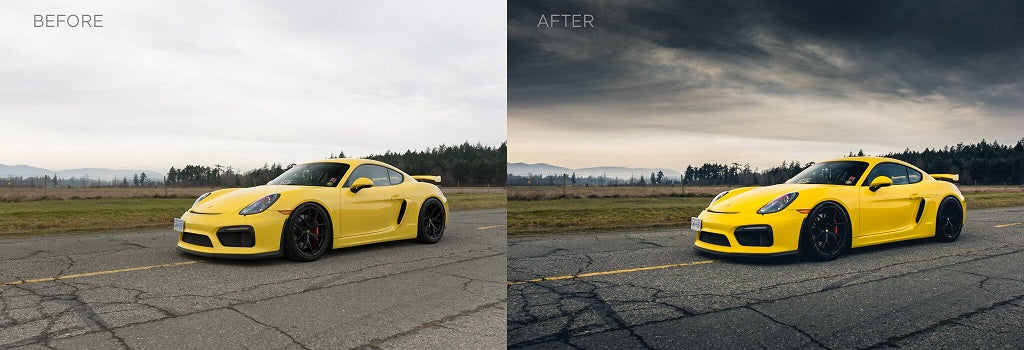
Enhance your car photos in Lightroom like a pro. Start by adjusting the exposure and white balance to bring out the vibrant colors. Next, use the graduated filter to darken the sky and create a more dramatic effect. Don’t forget to apply lens corrections and remove any distracting elements with the healing brush. Finally, add some creative touches with the vibrance and clarity sliders. With these techniques, your car photos will truly stand out.

Mastering the Art of Editing Car Photos in Lightroom
Editing car photos in Lightroom is a crucial step in achieving stunning and professional-looking images. Lightroom offers a wide range of tools and features that allow you to enhance the colors, tones, and details of your car photographs. Whether you’re a professional photographer or an amateur enthusiast, learning how to edit car photos in Lightroom can take your images to the next level. In this article, we will explore some effective techniques and tips to help you master the art of editing car photos in Lightroom.
Understanding the Basic Editing Tools in Lightroom
Before diving into the specific techniques, it’s essential to have a good understanding of the basic editing tools available in Lightroom. These tools will be the building blocks of your editing process and will help you achieve the desired results.
1. Adjusting Exposure and Contrast
The exposure and contrast of a car photo can significantly impact its overall look and feel. Lightroom provides sliders that allow you to adjust the exposure and contrast levels of your image. Experiment with these sliders to find the right balance and make your car photos pop.
2. Enhancing Colors and Vibrance
Colors play a vital role in car photography. Lightroom offers several tools to help you enhance and refine the colors in your images. The Vibrance and Saturation sliders can be used to boost the intensity of colors and make your car photos more eye-catching.
3. Fine-tuning White Balance
White balance is essential in car photography as it ensures that the colors in your image appear accurate. Lightroom provides various white balance presets, such as daylight, cloudy, and tungsten, or you can manually adjust the white balance using the Temperature and Tint sliders.
4. Sharpening and Noise Reduction
To bring out the intricate details of your car photos, it’s important to sharpen them appropriately. Lightroom offers a Sharpening tool that allows you to enhance the sharpness of your images selectively. Additionally, you can also reduce noise using the Noise Reduction tool to ensure a clean and polished look.
5. Adjusting Highlights and Shadows
Highlights and shadows play a crucial role in creating depth and dimension in car photos. Lightroom allows you to adjust the highlights and shadows individually using the corresponding sliders. This allows you to bring out the details in the bright and dark areas of your image, resulting in a more balanced and captivating photo.
6. Applying Filters and Presets
If you want to give your car photos a specific look or style, Lightroom provides a wide range of filters and presets. These filters and presets apply predefined adjustments to your images, saving you time and effort. Experiment with different filters and presets to find the one that complements your car photos the best.
7. Cropping and Straightening
Cropping and straightening are essential techniques in car photography that help you remove distractions and improve the composition of your photos. Lightroom offers powerful tools that allow you to crop and straighten your images with ease, ensuring a visually pleasing result.
8. Using Gradient Filters and Radial Filters
Gradient filters and radial filters in Lightroom can be incredibly useful in selectively adjusting specific areas of your car photos. These filters allow you to make targeted adjustments to the exposure, colors, and other aspects of your image. Utilizing gradient and radial filters can help you create dramatic and visually stunning effects.
9. Creating Virtual Copies for Different Edits
Creating virtual copies in Lightroom allows you to experiment with different edits without affecting the original image. This feature is particularly useful when you want to try out various editing styles or explore different creative looks for your car photos. By creating virtual copies, you can compare and choose the edit that best suits your vision.
10. Final Touches and Exporting
Once you have made all the necessary adjustments and edits to your car photos, it’s time to add the final touches and prepare them for export. Lightroom allows you to add sharpening, vignettes, and other finishing touches to enhance your images further. After completing the editing process, you can export your car photos in the desired format and resolution for sharing or printing.
The Art of Editing Car Photos in Lightroom: A Powerful Tool for Stunning Results
Edit car photos in Lightroom can take your car photography to new heights. By mastering the various editing tools and techniques in Lightroom, you can transform your raw car images into visually striking and professional-looking photographs. Experiment with different styles presets, and adjustments to find your unique editing style and make your car photos stand out.
Key Takeaways: How to Edit Car Photos in Lightroom
Editing car photos in Lightroom is a fun and creative process that can make your images stand out. Here are some key takeaways to keep in mind:
- Start by adjusting the exposure to bring out the details in the car.
- Use the HSL sliders to enhance the colors and make the car pop.
- Experiment with the clarity and contrast settings to add depth and definition to the car.
- Don’t forget to crop and straighten the image to improve composition.
- Apply selective adjustments to areas that need extra attention, such as removing distractions or enhancing specific features.
Frequently Asked Questions
Here are some common questions and answers about editing car photos in Lightroom.
1. How can I enhance the colors of my car photos in Lightroom?
To enhance the colors of your car photos in Lightroom, you can start by adjusting the white balance. This will correct any color casts and make the colors more accurate. Next, you can use the HSL sliders to fine-tune specific colors and make them more vibrant or muted. Additionally, you can use the Tone Curve tool to add contrast and depth to the colors in your car photos.
Another way to enhance the colors is by using the Split Toning feature. This allows you to add different colors to the highlights and shadows of the image, creating a unique color effect. Experiment with different settings until you achieve the desired look for your car photos.
2. How can I remove imperfections from my car photos in Lightroom?
In Lightroom, there are several tools you can use to remove imperfections from your car photos. The Spot Removal tool is great for removing small blemishes or distractions. Simply choose the tool, click on the imperfection, and Lightroom will automatically analyze the surrounding pixels to fill in the area seamlessly.
If you have larger imperfections, such as scratches or dents, you can use the Healing Brush tool. This tool allows you to paint over the imperfection and Lightroom will intelligently replace it with nearby similar pixels, matching the texture and color of the car body.
3. How can I make my car photos look more dynamic in Lightroom?
To make your car photos look more dynamic in Lightroom, you can start by adjusting the contrast and clarity sliders. Increasing the contrast will make the highlights brighter and the shadows darker, adding depth to the image. The clarity slider enhances the details and adds a sharpening effect, making the car stand out.
Another way to add dynamism is by using the Graduated and Radial Filters. These filters allow you to selectively adjust specific areas of the photo. For example, you can increase the exposure and saturation in the sky to create a more vibrant background. You can also use the Adjustment Brush to paint over certain areas and make specific adjustments to enhance the overall dynamic look of your car photos.
4. How can I create a professional-looking background for my car photos in Lightroom?
To create a professional-looking background for your car photos in Lightroom, you can use the Graduated Filter or the Adjustment Brush to darken or blur the background. This will help create separation between the car and the background, drawing more attention to the main subject.
Additionally, you can use the Dehaze tool to remove any haze or fog in the background, making it appear clearer and more defined. Experiment with different settings to achieve the desired look for your car photos.
5. How can I give my car photos a professional touch in Lightroom?
To give your car photos a professional touch in Lightroom, you can start by adjusting the exposure, highlights, shadows, and white balance to achieve a balanced and well-exposed image. Next, you can tweak the colors using the HSL sliders to create a harmonious color palette.
Additionally, you can add vignetting to draw focus to the car and create a more cinematic look. Play around with the various editing tools and filters available in Lightroom to add your style and creativity to your car photos.
Editing car photos in Lightroom can transform your ordinary images into stunning works of art. With just a few simple steps, you can enhance the colors, lighting, and overall appearance of your car photos.
Start by adjusting the exposure to ensure that your image has the right brightness and contrast. You can also play with the highlights and shadows to bring out the details in different areas of the photo. Next, use the color adjustments to make the colors pop. You can adjust the temperature to create a warmer or cooler look and use the vibrance and saturation sliders to make the colors more vibrant.
Don’t forget about sharpening and noise reduction. These tools can help you enhance the sharpness and clarity of the car’s details while reducing any unwanted noise or graininess. Lastly, apply some creative edits, such as adding a vignette to draw attention to the car or using the graduated filter to enhance the sky or background. With these simple editing techniques, you can take your car photos to the next level and wow your friends and family.