When it comes to showcasing cars in their best light, car photo editing is key. Did you know that the right editing settings can significantly enhance the appearance of a car, making it more visually appealing to potential buyers? By manipulating elements like brightness, contrast, color saturation, and sharpness, professional car photo editing can transform a simple image into a captivating visual that captures attention and drives interest.
Car media has evolved over the years, and so have the editing settings used to enhance car photos. From the early days of darkrooms and film processing to modern digital editing tools, the possibilities are endless.
With the advent of advanced software and techniques, car photographers and dealers can now easily adjust and fine-tune images to highlight the best features of a vehicle. This combination of technology and creativity has led to higher-quality car photos and a more engaging visual experience for potential buyers.
When it comes to achieving the best car photo editing settings, Car Media offers professional-grade features that enhance your images. With precision control over brightness, contrast, saturation, and more, you can easily fine-tune your car photos to perfection. Car Media’s intuitive interface ensures a seamless editing experience, allowing you to bring out the true beauty of your vehicle. Take your car photography to the next level with Car Media’s outstanding editing settings.

What are the best car photo editing settings?
Car Media is an important aspect of the automotive industry, allowing car enthusiasts and professionals to showcase their vehicles in the best possible light. One key factor in producing eye-catching car photos is the editing process. By making the right adjustments and settings, you can enhance the overall appearance of the car, making it look more attractive and appealing. In this article, we will explore the best car photo editing settings that can help you create stunning images.
Adjusting Exposure
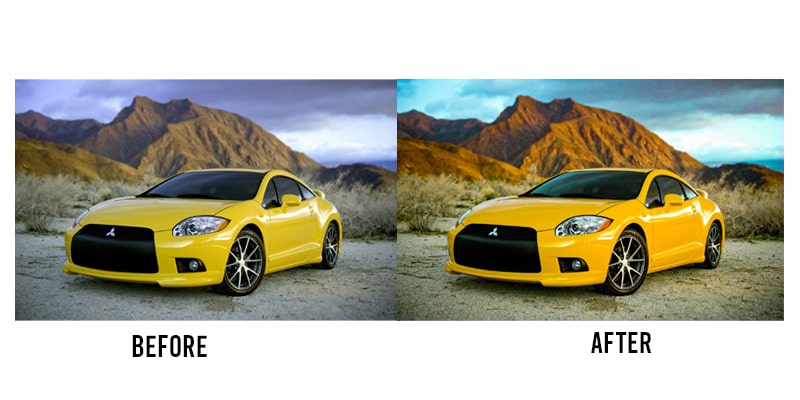
The first step in editing car photos is to adjust the exposure. This involves making the necessary tweaks to the brightness and contrast levels to ensure the car is well-lit and the details are visible. Overexposed or underexposed photos can make the car appear dull or washed out, so finding the right balance is crucial.
To adjust the exposure, you can use software programs like Adobe Photoshop or Lightroom. These tools provide various sliders and controls that allow you to fine-tune the exposure settings. Start by adjusting the brightness to make the image more vibrant. Then, modify the contrast to enhance the difference between light and dark areas of the photo.
Remember, the goal is to achieve a natural look while highlighting the car’s features. Take your time to experiment with the exposure settings until you achieve the desired result.
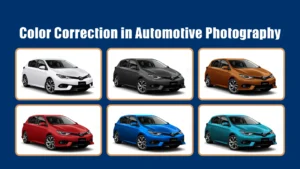
Enhancing Colors
Colors play a significant role in car photography, as they can evoke emotions and make the car stand out. Enhancing the colors in your car photos can make them more vibrant and appealing. However, it’s important to strike a balance and avoid going overboard with the saturation.
Start by adjusting the white balance to ensure accurate colors. This will help correct any color casts caused by different lighting conditions. Then, use the saturation and vibrance sliders to enhance the colors without making them look artificial. It’s important to maintain a natural look while bringing out the inherent beauty of the car’s paint job.
Additionally, consider adjusting individual color channels, such as red, green, or blue, to fine-tune specific color tones. This can be particularly helpful if a specific color stands out in the car’s design or if you want to correct any color inconsistencies.
Sharpening and Clarity
To make your car photos appear crisp and detailed, it’s important to apply sharpening and clarity adjustments. These settings help bring out the fine details in the car’s bodywork, making it look more defined and polished.
Sharpening, as the name suggests, increases the sharpness of the image by enhancing the edges. Be cautious not to apply too much sharpening, as it can create an unnatural look or introduce noise. Adjust the sharpening sliders gradually until you achieve the desired level of clarity.
Clarity, on the other hand, enhances the mid-tone contrast, giving the image more depth and definition. It can improve the overall look of the car, especially when applied judiciously. Experiment with the clarity settings to find the right balance that makes the car look sharp without introducing artifacts.
Removing Imperfections
Car photos often capture imperfections such as dust, scratches, or other blemishes that can distract from the car’s beauty. Removing these imperfections during the editing process is essential to ensure a flawless image.
Use the healing brush or clone stamp tool in editing software to remove any visible imperfections. These tools allow you to seamlessly remove unwanted elements by either blending them with the surrounding area or duplicating a clean area to cover the imperfection.
Take your time to go through the image and remove any noticeable imperfections. This will result in a clean and professional-looking car photo.
Cropping and Composition
The composition of a car photo is crucial in providing a visually appealing image. Cropping the photo can help remove any unnecessary elements and improve the overall composition. It allows you to focus on the car and highlight its key features.
When cropping, consider the rule of thirds, which divides the photo into a 3×3 grid. Position the car along these gridlines or at the intersection points to create a visually balanced and engaging composition.
Experiment with different cropping ratios and compositions to find the one that best showcases the car’s design and characteristics.
Applying Filters and Effects
To give your car photos a unique and stylized look, you can apply filters and effects. These can help create a specific mood or enhance the overall aesthetics of the image.
Popular filters include vintage, black and white, or cinematic effects. These can be applied using software presets or by adjusting the brightness, contrast, and colors manually.
However, it’s important to use filters and effects sparingly. The goal is to enhance the car’s appearance, not overpower it with excessive edits.
Saving in the Correct Format
Once you have finished editing your car photos, it’s important to save them in the correct format. For online use, JPEG is the most commonly used format as it offers a good balance between image quality and file size.
If you plan to print your car photos, consider saving them in a lossless format like TIFF or PNG to preserve the image quality. These formats retain more detail and provide better color accuracy.
Remember to save a copy of the original unedited image as well, in case you need to make further adjustments or corrections in the future.
How can these photo editing settings improve your car photos?
By applying the best car photo editing settings, you can greatly enhance the quality and aesthetics of your car photos. These settings allow you to bring out the true beauty of the car, making it more visually appealing to potential buyers or enthusiasts.
Proper exposure adjustments ensure that all the important details of the car are visible, while color enhancements make the vehicle stand out and create a more captivating image. Sharpening and clarity settings improve the overall sharpness and definition of the car, making it look more polished and professional.
Removing imperfections and applying proper composition techniques further elevate the quality of the photo, making it appear more refined and appealing. Filters and effects can add a unique touch to the image, giving it a distinct style.
By saving the photos in the correct format, you ensure that their quality is preserved and they can be used effectively for various purposes, whether it’s online or print media.
Key Takeaways – Best Car Photo Editing Settings
- Adjust the exposure to make the car stand out.
- Enhance the colors to make the car look vibrant and eye-catching.
- Use sharpening tools to bring out the intricate details of the car.
- Balance the highlights and shadows to create a well-lit photo.
- Crop and straighten the image to remove any distractions and make the car the focal point.
Frequently Asked Questions
Car Media is an essential aspect of showcasing vehicles in a visually appealing way. To enhance the quality of car photos, it is important to understand the best editing settings. In this FAQ section, we will address common questions regarding the best car photo editing settings.
What are the best car photo editing settings for enhancing colors and contrast?
To enhance colors and contrast in car photos, it is recommended to adjust the saturation and contrast levels. Start by increasing the saturation slightly to bring out the vibrancy of the colors without making them appear unnatural. Then, adjust the contrast to make the dark areas darker and the bright areas brighter, giving the image more depth and definition.
Additionally, adjusting the white balance can also help in improving colors. If the photo has a color tint, use the white balance tool to correct it. Experiment with different settings to achieve the desired outcome, but be cautious not to overdo it, as excessive editing can result in an unrealistic appearance.
What is the recommended resolution and file format for car photos?
When editing car photos, it is important to consider the resolution and file format to ensure optimal quality. For resolution, it is recommended to work with high-resolution images, typically around 300 dpi (dots per inch) for print or 72 dpi for web. This ensures that the details of the car are preserved and appear sharp.
As for the file format, using a lossless format like RAW or TIFF is ideal for editing purposes. These formats retain more information and provide greater flexibility in post-processing. However, if you need to save the final edited image for web use, JPEG is the most commonly used format due to its smaller file size and wide compatibility.
How can I remove unwanted objects or reflections from car photos?
To remove unwanted objects or reflections from car photos, there are several techniques you can utilize. One option is using the clone stamp tool to manually clone and replace the unwanted areas with surrounding pixels. This requires precision and attention to detail to seamlessly blend the cloned pixels with the rest of the image.
Alternatively, you can utilize content-aware fill, a powerful tool available in most photo editing software. This tool analyzes the surrounding areas and intelligently fills in the selected area with similar pixels, effectively removing unwanted objects or reflections. It may require some adjustments and refinements to achieve the desired result.
What are the recommended adjustments to improve the sharpness and clarity of car photos?
To enhance the sharpness and clarity of car photos, there are a few adjustments that can be made. Firstly, the sharpening tool can be used to increase the overall sharpness of the image. Adjust the amount and radius settings to find the right balance without introducing excessive artifacts.
In addition to sharpening, adjusting the clarity can also improve the overall clarity and definition of the car. The clarity slider enhances mid-tone contrast, making details appear crisper. Start with small adjustments and gradually increase the clarity until you achieve the desired effect.
How can I achieve a professional-looking car photo without making it appear overly edited?
To achieve a professional-looking car photo without making it appear overly edited, it is important to strike a balance between enhancing the image and maintaining its natural look. Avoid excessive use of filters or presets, as they can make the photo appear artificial.
Focus on subtle adjustments that enhance the car’s features while preserving its authenticity. Pay attention to details like lighting, composition, and color balance. Experiment with different editing settings to find the right balance that showcases the car in the best possible way, while still looking natural and appealing.
To achieve the best car photo editing settings, follow these professional tips. Start by adjusting the exposure and brightness to enhance the overall lighting. Next, tweak the contrast and saturation to make the colors pop. Additionally, apply a bit of sharpening to make the details stand out. Finally, don’t forget to crop and straighten the image for a clean and balanced composition.
By following these simple steps, you can enhance your car photos and make them look even more captivating. Remember to keep experimenting and trying different settings to find your preferred style.