Did you know that with just a few clicks in Adobe Photoshop, you can completely transform the colors in your images? Thanks to the versatile color replacement options, you have the power to turn a vibrant red car into a sleek black sedan or manipulate the hues in a landscape to create a whole new mood. The possibilities are endless when it comes to Photoshop Color Replacement.
When it comes to changing hue in Photoshop, the color replacement options provide a wealth of possibilities. With a rich history dating back to the early days of digital image editing, Photoshop has evolved to include advanced tools that make color manipulation a breeze.
Whether you want to make subtle adjustments or completely revamp the hues in your image, Photoshop offers various techniques, including the color replacement brush tool or the hue/saturation adjustment layer. With these powerful tools at your disposal, you can bring your creative visions to life and transform your images in ways you never thought possible.
Change Color in Photoshop – Color Replacement Options
Looking to change the color in Photoshop? Follow these steps for a seamless transformation:
- Open Photoshop and select the image you want to edit.
- Click on the “Edit” menu and choose “Color Replacement Tool.”
- Adjust the brush size and hardness to fit your requirements.
- Select the desired color from the color picker.
- Click and drag the brush over the areas you want to change.
- Continue refining until you achieve the desired result.
How to Change Color in Photoshop – Color Replacement Options
Photoshop Color Replacement can be a useful skill to have for various purposes, from enhancing the vibrancy of an image to correcting color inconsistencies. Luckily, Photoshop offers a range of hue replacement options that allow you to modify colors with precision and creativity.
In this article, we will explore different techniques and tools available in Photoshop for changing hue, providing you with the knowledge and skills to achieve the desired effects in your images.
Using the Color Replacement Tool
The hue Replacement Tool in Photoshop is a handy feature that allows you to selectively change colors in an image. To use this tool, select it from the Photoshop toolbar or press the ‘B’ key. Make sure to set the desired foreground color, as this will be the color used to replace the existing colors.
Adjust the brush size according to the area you want to modify and start painting over the image. The tool will automatically replace the original colors with the chosen foreground hue, giving you full control over the hue replacement process.
One of the main advantages of the hue Replacement Tool is its ability to preserve details and textures in the image while changing colors. However, it is important to use this tool carefully and avoid excessive saturation or unrealistic hue changes. Remember to save your work regularly to avoid losing progress or making irreversible changes.
Benefits of Using the Color Replacement Tool
- Easy and intuitive to use, even for beginners.
- Provides precise control over hue replacement.
- Preserves details and textures in the image.
- Allows for selective changes in specific areas.
Adjusting Hue and Saturation
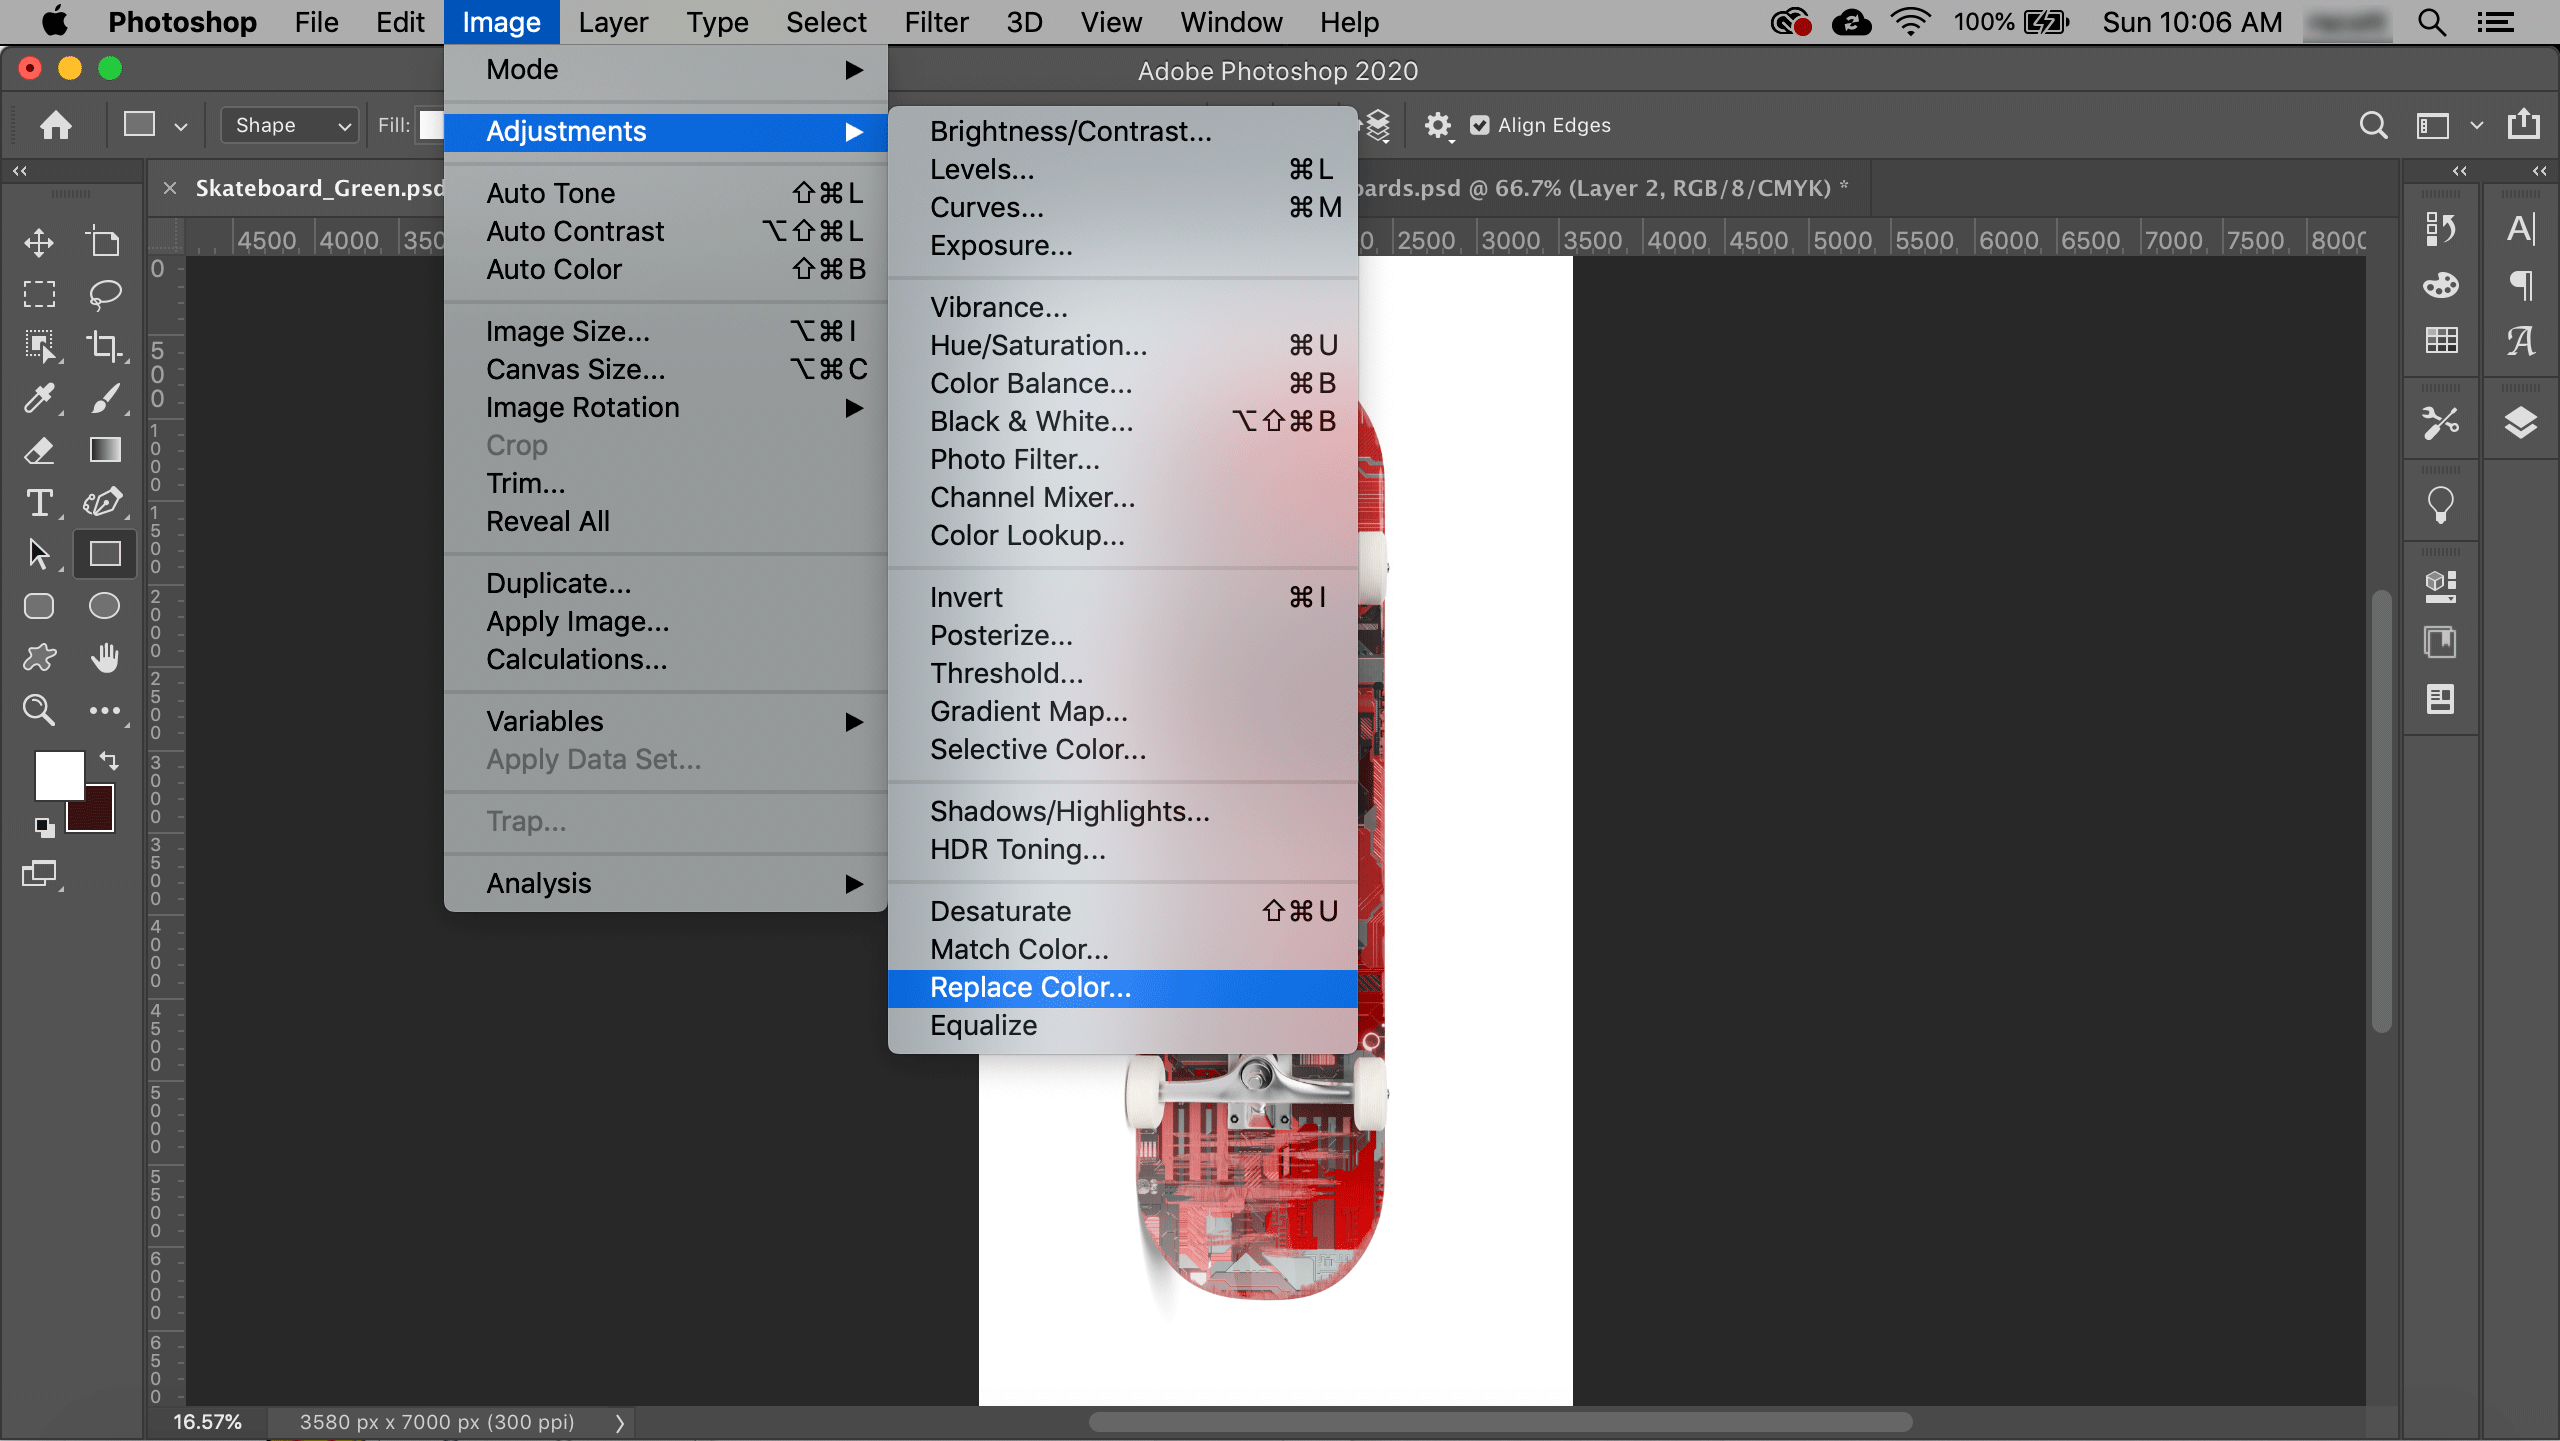
Another effective method of changing colors in Photoshop is by adjusting the hue and saturation of an image. This technique is particularly useful when you want to modify the overall glow scheme or create artistic effects. To adjust the hue and saturation, go to Image > Adjustments > Hue/Saturation in the Photoshop menu. A dialogue box will appear, allowing you to fine-tune the colors.
In the Hue/Saturation dialogue box, you can use the sliders to change the hue, saturation, and lightness of the image. Experiment with different settings until you achieve the desired glow changes. This method offers great flexibility and control over glow modifications, as it allows you to change the entire image’s color or target specific glow ranges.
Benefits of Adjusting Hue and Saturation
- Offers control over the overall color scheme.
- Allows for fine-tuning of specific color ranges.
- Provides flexibility in achieving desired color effects.
- Can create artistic and creative color variations.
Selective Color Adjustment
To target specific colors in your image and make precise adjustments, you can utilize the Selective hue Adjustment feature in Photoshop. This tool allows you to change the hue balance of individual hue channels, such as red, green, blue, cyan, magenta, yellow, and black.
To access Selective glow Adjustment, go to Image > Adjustments > Selective Color. A dialogue box will appear, presenting you with a range of color channels to choose from. By adjusting the sliders, you can add or subtract colors, enhancing or toning down specific hues in your image. This technique is particularly useful when you want to correct color casts or make subtle adjustments to specific colors.
Benefits of Selective Color Adjustment
- Provides precise control over individual color channels.
- Allows for correcting color casts and toning down specific hues.
- Offers the ability to make subtle and targeted color adjustments.
- Enhances color accuracy and balance in the image.
Duplicating and Blending Layers
An alternative method for changing colors in Photoshop is by duplicating the image layer and blending it with different blending modes. This technique allows you to experiment with various color effects without affecting the original image. To duplicate the layer, right-click on the layer in the Layers panel and select “Duplicate Layer.”
Once you have duplicated the layer, try changing the blending mode from the dropdown menu located at the top of the Layers panel. Each blending mode creates a unique hue blending effect, allowing you to achieve different hue variations. Additionally, you can adjust the opacity of the duplicated layer to fine-tune the color changes further.
Benefits of Duplicating and Blending Layers
- Allows for non-destructive hue changes.
- Provides a range of blending modes for different color effects.
- Easy to experiment with various hue variations.
- Offers flexibility in adjusting the opacity of the duplicated layer.
Using Color Lookup Tables
Color Lookup Tables, or LUTs, are pre-defined color adjustments that can be applied to your images in Photoshop. They offer quick and convenient ways to change colors and apply specific color styles. To access Color Lookup Tables, go to Image > Adjustments > Color Lookup.
In the hue Lookup dialogue box, you can choose from a variety of pre-installed LUTs or load custom LUTs. Each LUT applies a distinctive color grading to your image, allowing you to create dramatic effects or simulate different film looks. You can adjust the opacity of the LUT layer to control the intensity of the color changes.
Benefits of Using Color Lookup Tables
- Provides quick and easy hue adjustments.
- Offers a range of pre-installed LUTs and the option to load custom LUTs.
- Allows for creating unique and distinctive color effects.
- Enhances image with dramatic hue grading or film simulations.
Gradient Map Adjustment
The Gradient Map adjustment is another powerful tool in Photoshop for changing colors. It maps the original image’s tonal range to a gradient of colors, allowing you to create dynamic and visually appealing hue transformations. To use the Gradient Map adjustment, go to Image > Adjustments > Gradient Map.
In the Gradient Map dialogue box, you can choose the colors for the gradient. By default, Photoshop provides a black-to-white gradient, but you can customize it according to your preferences. Experiment with different color combinations to achieve the desired color changes. This technique is particularly effective for creating surreal or artistic hue effects.
Benefits of Gradient Map Adjustment
- Allows for dynamic and visually appealing hue transformations.
- Provides flexibility in choosing custom gradients.
- Enhances image with surreal or artistic hue effects.
- Can be used for creative and experimental color variations.
Using Adjustment Layers
Adjustment layers in Photoshop offer a non-destructive way to modify colors. They allow you to apply various hue adjustments, such as levels, curves, brightness/contrast, and vibrance, without permanently altering the original image. To add an adjustment layer, go to the Layers panel and click on the adjustment layer icon.
Once you have added an adjustment layer, you can adjust the settings to modify the colors in your image. The benefit of using adjustment layers is that they can be easily edited or removed, allowing you to fine-tune the hue changes. You can also apply layer masks to limit the effect of the adjustment layer to specific areas of the image.
Benefits of Using Adjustment Layers
- Non-destructive way to modify colors.
- Offers a range of color adjustment options.
- Allows for easy editing and fine-tuning of color changes.
- Provides flexibility with layer masks for selective adjustments.
Additional Techniques for Changing Color in Photoshop
1. Channel Mixer Adjustment
The Channel Mixer adjustment in Photoshop enables you to mix the hue channels of an image, providing flexibility in color correction and stylization. This tool allows you to adjust the red, green, and blue channels individually or collectively to achieve desired hue changes.
2. Pattern Fill Adjustment Layer
With the Pattern Fill adjustment layer, you can fill a selection or an entire image with a pattern. This technique is useful for adding textured or patterned color effects to your images. Photoshop includes a range of pre-installed patterns, or you can create and upload custom patterns.
3. Healing Brush Tool for Color Correction
The Healing Brush Tool in Photoshop is not only for removing imperfections; it can also be used for color correction. By sampling colors from one part of the image and applying them to another, you can correct color irregularities and achieve more visually appealing results.
Changing colors in Photoshop is a powerful technique that allows you to enhance your images creatively. Whether you want to correct color inconsistencies, create artistic effects, or simply experiment with different color variations, Photoshop provides a variety of tools and features to cater to your needs.
By exploring and mastering the color replacement options available, you can unleash your creativity and achieve stunning results in your digital artwork and photographs. Remember to practice and experiment with different techniques to find your own unique style and visual language in color manipulation.
Key Takeaways – Photoshop Color Replacement Options
- Changing the color of an object in Photoshop is easy and can be done using the Photoshop Color Replacement Tool.
- Select the Color Replacement Tool from the toolbar and adjust its settings according to your needs.
- Choose the desired color you want to replace and start painting over the object with the Color Replacement Tool.
- Use the Brush options to adjust the size, hardness, and opacity of the tool for more precise color replacement.
- Experiment with different blending modes and brush settings to achieve the desired color result.
Frequently Asked Questions
In this section, we will address some common questions regarding changing colors in Photoshop using color replacement options.
1. How can I change the color of an object in Photoshop?
To change the color of an object in Photoshop, you can use the color replacement tool. First, select the object you want to change the color of. Then, navigate to the toolbar and select the brush tool. In the options bar, click on the color swatch to choose the new color you want to apply. Finally, paint over the object with the brush tool, and Photoshop will replace the original color with the new one.
An alternative method is to use the Hue/Saturation adjustment layer. Select the object you want to change the color of, and then go to the Adjustments panel and click on the Hue/Saturation icon. Use the sliders to adjust the hue, saturation, and lightness to achieve the desired color. This method allows for more precise control over the color changes.
2. Can I change the color of multiple objects at once in Photoshop?
Yes, you can change the color of multiple objects at once in Photoshop. One way to do this is by using the Select Color Range tool. First, make a selection of one object using any selection tool of your choice, such as the Magic Wand or Quick Selection tool.
Then, go to the Select menu and choose Color Range. Select the desired color range using the eyedropper tool and adjust the fuzziness slider if needed. Click OK, and the selection will be created. Now, you can apply the color changes to all selected objects using any of the color replacement methods mentioned earlier.
You can also use adjustment layers to change the color of multiple objects simultaneously. Create an adjustment layer, such as Hue/Saturation or Solid Color, and adjust the settings to achieve the desired color. This adjustment layer will affect all layers below it, including multiple objects.
3. Is it possible to change the color of a transparent object in Photoshop?
Yes, you can change the color of a transparent object in Photoshop. To do this, create a new layer below the transparent object layer. Then, select the transparent object layer and use any of the color replacement methods mentioned earlier to change its color. The new color will be applied to the transparent areas of the object, allowing you to see the color on the layer below.
If the transparent object layer contains a mask, you can also paint directly on the mask with a color of your choice using the brush tool. This will add color to the transparent areas of the object and achieve the desired color change.
4. What other color adjustment options are available in Photoshop?
Aside from color replacement Photoshop offers a wide range of color adjustment options. Some of the most commonly used ones include the Hue/Saturation adjustment layer, which allows you to change the hue, saturation, and lightness of an image; the Color Balance adjustment layer, which helps in adjusting the overall balance of colors; and the Selective Color adjustment layer, which provides precise control over individual color channels.
You can also use the Gradient Map adjustment layer to apply a gradient of colors to your image, or the Replace Color adjustment tool to selectively replace a specific color with another one. These are just a few examples of the many color adjustment options available in Photoshop, allowing you to create stunning color effects and manipulations.
5. Can I undo Color Replacement in Photoshop?
Yes, you can easily undo color changes in Photoshop. To undo the most recent color change, you can use the keyboard shortcut Ctrl+Z (Windows) or Command+Z (Mac). This will revert the image to its previous state. If you want to undo multiple color changes, you can use the History panel. Go to Window > History to open the History panel, which records every action you perform on the image. Simply click on any previous history state to revert to that specific point in the editing process.
In addition, if you have saved your project as a Photoshop (.psd) file, you can always reopen the file and start fresh with the original untouched image. This provides a failsafe option if you need to completely undo all color changes.