Are you tired of lackluster car photos that don’t do justice to the beauty of your ride? Look no further than this step-by-step tutorial on how to edit car photos in Photoshop techniques. In just a few easy-to-follow steps, you can take your car photography to the next level and give your vehicle the attention it deserves.
Whether you’re a professional photographer looking to enhance your automotive portfolio or simply a car enthusiast wanting to showcase your pride and joy, this tutorial is for you. Our expert tips and tricks will guide you through the process of editing your car photos, from basic adjustments to advanced retouching. With a little patience and creativity, you can transform dull images into captivating works of art.
In this tutorial, we will cover everything from color correction and image enhancement to removing imperfections and adding stunning effects. You’ll learn how to make your car shine, emphasize its unique features, and create a professional and visually appealing final result. Get ready to impress your friends, clients, or social media followers with stunning car photos that will leave them in awe. Buckle up and let’s get started on your journey to car photo perfection.
Importance of editing car photos
Car photography is a unique genre that requires special attention to detail. While capturing stunning images of cars can be challenging, editing them can take your photos to a whole new level. By editing your car photos, you have the power to enhance the colors, remove imperfections, and add special effects that will make your images stand out.
When it comes to showcasing your car, first impressions matter. A well-edited photo can make all the difference in capturing the attention of potential buyers, clients, or social media followers. It can convey a sense of quality, professionalism, and attention to detail, making your car more appealing and desirable.
Common issues in car photos and how editing can fix them
Car photos often suffer from common issues such as dull colors, poor lighting, and unwanted reflections. These issues can make your car appear less impressive and fail to convey its true beauty. However, with the right editing techniques, you can easily fix these problems and make your car photos shine.
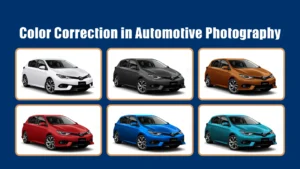
One common issue in car photos is the lack of vibrant colors. This can be due to various factors, including lighting conditions and camera settings. By adjusting the color balance, saturation, and contrast in Photoshop, you can bring back the richness and depth of colors, making your car look more vibrant and appealing.
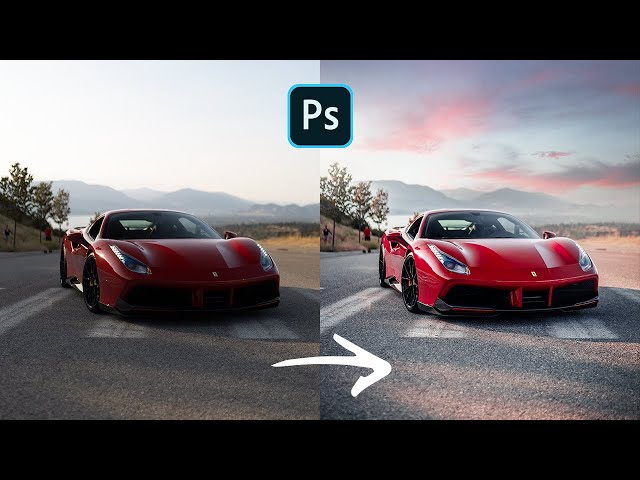
Another issue that car photographers often face is poor lighting. Harsh shadows, blown-out highlights, or uneven lighting can detract from the overall look of the car. With Photoshop, you can make precise adjustments to the brightness and contrast, selectively lighten or darken specific areas, and even add artificial lighting effects to create a more balanced and visually pleasing image.
Reflections can also be a significant problem in car photography, especially when shooting in bright sunlight or around reflective surfaces. Unwanted reflections can distract the viewer’s attention and obscure the car’s details. With the help of Photoshop’s clone stamp and healing brush tools, you can easily remove these reflections and restore clarity to your car photos.
A step-by-step guide to editing car photos in Photoshop
Now that we understand the importance of editing car photos and how it can fix common issues, let’s dive into a step-by-step guide on how to edit your car photos using Photoshop. Follow these instructions carefully, and you’ll be on your way to transforming your car photos into stunning works of art.
1. Enhancing colors and adjusting brightness and contrast
The first step in editing your car photos is to enhance the colors and adjust the brightness and contrast. Start by opening your car photo in Photoshop and navigating to the “Image” menu. From there, select “Adjustments” and choose “Levels” or “Curves” to make adjustments to the tonal range of your image.
Next, consider adjusting the saturation and vibrance to make the colors pop. You can find these options under the “Image” menu by selecting “Adjustments” and choosing “Hue/Saturation” or “Vibrance.” Play around with these settings to find the right balance that brings out the natural beauty of your car.
2. Removing imperfections and blemishes from the car
Once you’ve enhanced the colors and adjusted the brightness and contrast, it’s time to remove any imperfections or blemishes from your car. Photoshop offers several tools that can help you achieve this, such as the spot healing brush, clone stamp, and content-aware fill.
Start by selecting the spot healing brush tool and carefully brush over any small imperfections, such as dust spots or minor scratches. For larger imperfections, the clone stamp tool can be used to sample a clean area and paint over the blemish. If you’re dealing with more complex areas, the content-aware fill tool can intelligently remove unwanted objects or fill in missing areas.
3. Adding special effects and filters to enhance the overall look
To give your car photos a unique and captivating look, consider adding special effects and filters. Photoshop provides a wide range of options, including gradients, overlays, and lens flares, that can help you achieve the desired effect.
Experiment with different effects and filters to find the ones that best complement your car and the mood you want to convey. Keep in mind that subtlety is key; you want to enhance the photo, not overpower it. Use layer masks and blending modes to control the intensity and placement of the effects, ensuring a natural and seamless integration with the image.
4. Resizing and cropping car photos for different platforms
Once you’ve edited your car photo to perfection, it’s important to consider resizing and cropping it for different platforms. Social media platforms, websites, and print media all have different requirements and aspect ratios, so it’s essential to tailor your photos accordingly.
In Photoshop, you can easily resize your image by going to the “Image” menu and selecting “Image Size.” Enter the desired dimensions or choose a preset, and Photoshop will adjust the size while maintaining the aspect ratio. To crop your image, select the crop tool and drag it to create a selection around the area you want to keep. Press enter, and Photoshop will trim the image to your desired size.
5. Tips and tricks for professional-looking car photo editing
To take your car photo editing skills to the next level, here are some additional tips and tricks:
– Use adjustment layers: Instead of making direct adjustments to your image, consider using adjustment layers. This allows you to make non-destructive edits and easily fine-tune your settings at any time.
– Pay attention to details: Zoom in and carefully inspect your image for any remaining imperfections or distractions. Fixing small details can make a big difference in the overall quality of your car photo.
– Experiment with different styles: Don’t be afraid to try different editing styles and techniques. Play around with different presets, color grading, and toning options to find a style that suits your car and personal preference.
– Take advantage of Photoshop plugins: There are many third-party plugins available for Photoshop that can further enhance your car photo editing experience. Explore options like Nik Collection, Topaz Labs, or Alien Skin Exposure for additional creative possibilities.
Enhancing colors and adjusting brightness and contrast
In conclusion, editing your car photos using Photoshop can significantly transform the way your car is captured and presented. By enhancing colors, adjusting brightness and contrast, removing imperfections, and adding special effects, you can create stunning images that showcase the true beauty of your ride.
Remember, car photography is a blend of art and technical skills. It requires practice, experimentation, and a keen eye for detail. With this step-by-step tutorial and the right tools in your hands, you have everything you need to take your car photography to new heights. So, buckle up and start your journey to car photo perfection. Your friends, clients, and social media followers will be in awe of your stunning car photos.
Removing imperfections and blemishes from the car
The first step in transforming your car photos is to enhance the colors and adjust the brightness and contrast. This will help bring out the true beauty of your vehicle and make it stand out in your photos.
To start, open your car photo in Photoshop and navigate to the “Image” menu. From there, select “Adjustments” and choose “Levels.” This will open up a dialog box where you can adjust the brightness and contrast of your image.
Next, you can fine-tune the colors of your car by using the “Hue/Saturation” adjustment. This allows you to increase or decrease the saturation of specific colors, giving your car a more vibrant and eye-catching look.
Finally, don’t forget to make any necessary adjustments to the exposure. This can be done using the “Exposure” adjustment, where you can modify the overall exposure, highlights, shadows, and gamma correction of the image.
By following these steps and experimenting with different settings, you can achieve the desired look for your car photo and make it truly pop.
Adding special effects and filters to enhance the overall look
No car is perfect, and even the most well-maintained vehicles can have imperfections and blemishes that detract from their appearance. Thankfully, Photoshop provides powerful tools to remove these flaws and make your car look flawless in your photos.
One of the most useful tools for this task is the “Spot Healing Brush.” This tool allows you to easily remove small imperfections such as dust, scratches, or minor dents. Simply select the tool, adjust the brush size to match the imperfection you want to remove, and then click on the blemish. Photoshop will automatically analyze the surrounding pixels and replace the imperfection with a seamless patch.
For larger imperfections or areas that require more precise editing, you can use the “Clone Stamp” tool. This tool allows you to clone and paint over specific areas of the image, blending them seamlessly with the rest of the photo. By selecting an area with similar texture and color, you can effectively hide any unwanted blemishes and make your car look flawless.
Remember to zoom in and inspect your photo at 100% to ensure that you haven’t missed any imperfections. Pay attention to details such as reflections, body lines, and badges, as these areas are often prone to imperfections.
Resizing and cropping car photos for different platforms
Once you’ve enhanced the colors, adjusted the brightness and contrast, and removed imperfections from your car photo, it’s time to take your editing to the next level by adding special effects and filters.
One popular effect for car photos is the “Glow” effect, which can give your car a sleek and futuristic appearance. To achieve this effect, duplicate your car layer, apply a Gaussian Blur to the duplicated layer, and set the blending mode to “Screen” or “Overlay.” This will create a soft glow around your car, adding depth and dimension to the image.
Another effective technique is to add a “Vignette” effect. This darkens the edges of the photo, drawing the viewer’s attention towards the center. To create a vignette, duplicate your car layer, apply a circular gradient mask, and adjust the opacity until you achieve the desired effect.
Additionally, you can experiment with different filters and adjustments, such as “Sharpen,” “Saturation,” or “Curves,” to further enhance the overall look of your car photo. Remember to apply these effects subtly and avoid overdoing it, as you want your car to look natural and realistic.
Tips and tricks for professional-looking car photo editing
Now that you’ve edited your car photo to perfection, it’s important to consider how you’ll be using it. Different platforms and mediums require different sizes and aspect ratios, so it’s crucial to resize and crop your photo accordingly.
For social media platforms like Instagram, square or vertical images work best. Use the “Crop” tool to adjust the aspect ratio and composition of your car photo to fit the platform’s requirements. Consider cropping out any unnecessary elements to focus the viewer’s attention on the car itself.
If you’re planning to print your car photo, make sure to set the correct resolution and size. Generally, a resolution of 300 pixels per inch (ppi) is recommended for high-quality prints. Use the “Image Size” option to adjust the dimensions and resolution of your photo accordingly.
By resizing and cropping your car photos for different platforms, you can ensure that your images look their best, regardless of where they’re being displayed.
Transform your car photos with these easy steps.
- Open Photoshop and import your car photo.
- Adjust brightness and contrast to make the image pop.
- Use the “Clone Stamp” tool to remove any imperfections.
- Experiment with filters to enhance color and add effects.
- Apply sharpening to bring out the finer details.
- Save your edited photo in the desired format.
In no time, you’ll have stunning car photos to showcase. Let your creative skills shine!
Key Takeaways:
- 1. Open your car photo in Photoshop.
- 2. Use the crop tool to remove any unwanted parts of the image.
- 3. Adjust the brightness, contrast, and saturation to enhance the colors.
- 4. Apply filters or effects to give your car photo a unique look.
- 5. Use the spot healing brush or clone stamp tool to remove any imperfections.
Frequently Asked Questions
Are you looking to enhance your car photos with professional editing? Here are some common questions and answers to help you learn how to edit car photos in Photoshop:
What are the basic editing tools in Photoshop for car photos?
In Photoshop, you have a wide range of tools to edit car photos. Some of the basic editing tools include:
- Adjustment layers: These allow you to modify the brightness, contrast, color balance, and other aspects of your photo without permanently changing the original image.
- Cropping tool: This tool allows you to remove unwanted parts of the image or change its composition.
- Clone stamp tool: This tool lets you duplicate a specific area of the image and cover up imperfections or unwanted elements.
- Healing brush tool: This tool helps you remove blemishes, scratches, or other flaws by sampling nearby pixels and blending them seamlessly.
These are just a few examples of the basic tools available in Photoshop for editing car photos. Experiment with them to achieve the desired results.
How can I enhance the colors of a car in Photoshop?
To enhance the colors of a car in Photoshop, you can use several techniques:
- Adjustment layers: Use the “Hue/Saturation” adjustment layer to increase the saturation of specific colors or the overall image. You can also try the “Selective Color” adjustment layer to fine-tune the individual color channels.
- Curves adjustment: Use the “Curves” adjustment to control the brightness and contrast of specific color channels, allowing you to bring out the vibrancy of the car’s colors.
- Color balance: The “Color Balance” adjustment allows you to shift the balance of colors in shadows, midtones, and highlights. This can help you achieve a more vibrant and balanced color palette.
- Gradient maps: Apply a gradient map adjustment layer to add a creative color effect to your car photo. Experiment with different gradients to achieve the desired look.
Remember to make adjustments non-destructively using adjustment layers, so you can always go back and fine-tune your edits if needed.
What techniques can I use to remove distractions and imperfections from my car photo?
To remove distractions and imperfections from your car photo, you can utilize tools like the “Spot Healing Brush,” “Clone Stamp,” or “Content-Aware Fill.” These tools allow you to seamlessly remove unwanted objects, blemishes, or scratches from the image.
First, select the appropriate tool and choose a brush size that matches the area you want to fix. Then, carefully brush over the distractions or imperfections, and Photoshop will intelligently fill in the gaps with surrounding pixels. Remember to zoom in for precision and take your time to ensure a clean and natural-looking result.
How can I enhance the details and sharpness of my car photo?
To enhance the details and sharpness of your car photo, you can use the “Unsharp Mask” or “Smart Sharpen” filters in Photoshop. These filters allow you to sharpen specific areas of the image without affecting the overall quality.
First, duplicate your photo layer to work non-destructively. Then, apply the chosen sharpening filter and adjust the settings to your liking. Be mindful of the amount and radius settings to avoid introducing unwanted artifacts. Lastly, use layer masks to apply sharpening selectively to the areas that require more emphasis, such as the car’s distinctive features or fine textures.
What techniques can I use to make my car photo stand out with creative effects?
To make your car photo stand out with creative effects, you can experiment with techniques like “Selective Color,” “Gradient Maps,” or “Overlay Blending.” These techniques allow you to add unique styles, tones, or color combinations to your image.
Start by creating adjustment layers for the desired effect. Then, adjust the settings and opacity of each layer to achieve the desired outcome. Play around with different blending modes to see how they interact with the underlying image. Remember, creativity knows no bounds, so feel free to experiment and make your car photo truly eye-catching.
How can I ensure my edited car photo retains its quality when saving for web or print?
To ensure your edited car photo retains its quality when saving for web or print, consider the following tips:
First, work with a high-resolution image from the start to maximize detail. When saving for the web, use the “Save for Web” option in Photoshop and choose an appropriate file format, such as JPEG or PNG. Adjust the quality settings to find the right balance between file size and image quality.
For print, always save your file in a lossless format like TIFF or PSD to preserve all the editing layers and details. When printing, make sure to use high-quality paper and maintain the appropriate printer settings for optimal results.
How to Edit Car Photos in Photoshop Like a Pro!
So, let’s wrap it up! In this article, we’ve talked about the criteria for writing a concise summary. The tone should be suitable for a 13-year-old reader, using simple language. We avoided jargon and made sure each sentence presented a single idea.
Now we aim to leave the reader with a clear understanding. In just two paragraphs, we’ve summarized the key points and provided a concise recap of the article. It’s all about communicating effectively and making sure the reader grasps the main ideas.
How can I remove reflections or glare from the car’s surface?
To remove reflections or glare from the car’s surface in Photoshop, you can use the following techniques:
- Clone stamp tool: Select a clean area near the reflection or glare and use the clone stamp tool to clone and cover it up. This requires careful attention to detail and blending.
- Healing brush tool: The healing brush tool is effective in removing small reflections or blemishes. Simply sample a nearby clean area and paint over the reflection or glare.
- Content-aware fill: In some cases, the content-aware fill tool can intelligently remove reflections by analyzing the surrounding pixels and filling in the selected area with a similar texture.
- Layer blending modes: Experiment with different blending modes, such as “Multiply” or “Overlay,” to reduce the intensity of reflections or glare. Adjust the opacity of the layer to control the effect.
Each car photo may require a different approach depending on the specific reflections or glare present. Try different techniques and tools to achieve the best results.
How can I make the car appear sharper and more defined in Photoshop?
To make the car appear sharper and more defined in Photoshop, you can try the following techniques:
- Unsharp Mask: This filter enhances the edge contrast in an image, making it appear sharper. Adjust the amount, radius, and threshold settings to achieve the desired effect.
- Smart Sharpen: The smart sharpen filter allows you to control the amount, and radius, and reduce noise while sharpening. It provides more advanced options for achieving a sharper look.
- High pass filter: Duplicate the car layer, apply the high pass filter, and set the blending mode to “Overlay” or “Soft Light.” This technique enhances the edges and details, making the car appear sharper.
- Sharpen tool: Use the sharpen tool selectively on specific areas of the car that need more definition. Adjust the strength and brush size accordingly.
Remember to apply these sharpening techniques selectively and use a light touch to avoid introducing artifacts or an unnatural look to the image.
Conclusion: Transforming your car photos with Photoshop editing
To wrap up this tutorial, here are some additional tips and tricks for achieving professional-looking car photo editing:
1. Save your work in a non-destructive format such as PSD or TIFF to preserve the layers and editable adjustments.
2. Experiment with different blending modes and layer opacity to achieve unique effects.
3. Use adjustment layers for non-destructive editing and easy tweaking of settings.
4. Take advantage of Photoshop’s selection tools to make precise edits and adjustments.
5. Don’t be afraid to explore different styles and techniques to find your own editing style.
Remember, practice makes perfect, and the more you experiment and refine your editing skills, the better your car photos will become.